Links to everything I mentioned are available here: [link].
In this video, I'm testing out the Yeedi S20 Infinity - and honestly, I was pretty skeptical at first because... I mean, how much better can robot vacuums actually get at this point? But this thing has some features I haven't seen before. I'll walk you through the unboxing, show you how the self-cleaning station works, and give you my real thoughts. Also sharing some things that surprised me (both good and not-so-good) after using it for a bit, so if you're thinking about getting a robot vacuum or upgrading your current one, this might help you decide if this one's worth it 🔗 links https://amzn.to/48virF9 Yeedi S20 Infinity Robot Vacuum&Mop with 19,500Pa Blast Suction, PowerBoost Charging, OZMO Roller 2.0 Self-Washing, Bagless OmniCyclone Station with Hot Mop Washing&Heat Drying, AIVI 3D Navigation https://amzn.to/3KynxbD Yeedi Cleaning Solution (1L) Compatible with S20/S16/S14/M14/M12/C12 Series Robotic Vacuum Cleaner, Include Cleaning Solution 🎥 related videos How to clean Roborock Q Revo FAST! Maintenance for Best Performance and Odor Control 🫧🧹 https://youtu.be/hmh8cX6-0Ps Roborock Q REVO REVIEW - what I wished I KNEW before + my TIPS 🔥 https://youtu.be/tl9VY24fSN4 Narwal Freo Robot Vacuum Mop Review: Watch This Before Buying! (Not-sponsored) https://youtu.be/SkyjRsb2NMY Roborock S7 - 2 Year Review! Is it still worth it? https://youtu.be/95hHT0XclS0 ECOVACS DEEBOT T30s | 1 Year Review https://youtu.be/lhv3_-lY56s 🔎 video topics yeedi robot vacuum, robot vacuum and mop combo, best robot vacuum 2026, yeedi s20 unboxing, self emptying robot vacuum, truedge mopping technology, robot vacuum comparison, roborock vs yeedi, smart home cleaning, automated floor cleaning, robot mop review, hardwood floor robot vacuum, pet hair robot vacuum, budget robot vacuum, yeedi setup guide, robot vacuum maintenance, smart vacuum features, home cleaning tech, vacuum suction power test ⏳ timestamps 0:00 why this robot vacuum is a game changer for large homes 0:49 powerboost charging solves the biggest robot vacuum problem 1:51 19,500pa blast suction & deep cleaning mode 2:47 osmo roller 2.0 mopping system upgrade 4:28 advanced mapping & navigation technology 5:22 bagless omnicyclone station 6:46 zero tangle v-shaped brush technology 7:40 flexible cleaning modes & what's missing 8:38 discount code & final thoughts 🎥 my most recent video: → https://www.youtube.com/watch?v=JGj75g54JiQ&list=UULFCWgCP5rY1cEVGGK2bHcY4w&index=1 👋 you can find me here http://juliacaban.com instagram: https://ift.tt/3caNLI0 subscribe: https://bit.ly/3aXtqaz ✉️ business inquires contactjuliacaban@gmail.com ❗️disclaimer FTC: This video is sponsored. All opinions expressed are my own. In order to support my channel, I share affiliate links, which means I earn a small commission if you make a purchase through them, however, this does not affect how much the item costs you. As an Amazon Associate, I earn from qualifying purchases. That being said, I only promote products that I genuinely stand by. thanks for watching ❤️
Links to everything I mentioned are available here: [link].
LOT Polish Airlines Premium Economy Review: My Honest Experience From Warsaw to LA
So I recently flew LOT Polish Airlines Premium Economy from Warsaw back to Los Angeles, and honestly? It was a completely different experience from our outbound flight on the Dreamliner. I'm talking broken seats, dirty cabin, chaotic boarding... the whole nine yards. If you're considering booking Premium Economy with LOT (especially on their older aircraft), you'll want to read this first.
The Broken Seat Situation That Ruined the Flight
From the moment we stepped onto the plane in Warsaw, things felt off. Tony's seat in Premium Economy (you know, the one we specifically paid extra for) wouldn't recline at all. He kept trying to adjust it, thinking maybe he was doing something wrong, but nope... it was just completely broken. For a 12-hour flight. Can you imagine sitting completely upright for 12 hours straight? I offered him my working window seat and he decided to just stick it out. Looking back, that was probably a mistake because watching him try to get comfortable for that entire flight was honestly heartbreaking.
Chaotic Boarding and Overwhelmed Flight Attendants
When we tried getting help from the flight attendants about the broken seat, they seemed totally overwhelmed. The whole boarding process was absolute chaos, with people arguing over seats and confusion everywhere. I've flown a lot (you can check out my other flight reviews here), and I've never seen anything quite like it. It was as if nobody knew what was going on, and the stress in the air was palpable. The flight attendants kept telling us to find any available seat in Premium Economy, but by the time they gave us permission to move, other passengers had already claimed all the empty spots with their bags and stuff.
The Aircraft Was Worn Down and Dirty
The plane itself was nothing like the beautiful Dreamliner we flew on our way to Warsaw. Everything felt worn down and honestly kind of dirty. I try not to be too picky about these things because I know aircraft get a lot of use, but when I found old gum stuck on my seatbelt... that was just too much. I mean, come on, this is Premium Economy we're talking about. The cabin felt really outdated compared to the sleek Dreamliner experience we had on our outbound flight, and it was pretty clear this aircraft needed some serious maintenance and cleaning.
The One Thing LOT Gets Right: The Food
Now I have to say, the food was absolutely incredible. It's definitely something LOT consistently gets right, no matter which plane you're on. We had this amazing chicken dish with Silesian dumplings, asparagus, and a warm beet salad for our first meal. The presentation was beautiful and everything tasted even better than it looked. Later in the flight they served these delicious pierogies with fruit salad that were just perfect. I've flown with lots of airlines and LOT's food service is genuinely some of the best I've experienced on long-haul flights. It was definitely a bright spot in an otherwise challenging journey.
What LOT Offered as Compensation
After we landed, I reached out to LOT about Tony's broken seat situation. They responded pretty quickly and offered a 30% discount on a return ticket in Premium or Economy class on any of their routes. While I appreciate them acknowledging the issue and responding at all, I'm honestly not sure if it really makes up for Tony spending 12 uncomfortable hours in a broken seat. Especially considering how much extra we paid for Premium Economy in the first place. I'm curious what you guys think... is 30% off a future flight fair compensation for this kind of situation?
The Stark Contrast With Our Outbound Flight
The whole situation was made even more frustrating because of the stark contrast with our outbound flight to Warsaw. The Dreamliner experience had been so comfortable and pleasant, with attentive service and everything working perfectly. This return flight felt like a completely different airline. The cabin was dirty, the seats had issues, and the overall atmosphere was just chaotic and stressful. I understand that airlines have different aircraft in their fleet, but the difference in quality was really shocking. It's like paying for the same service twice and getting completely different experiences.
Would I Book LOT Premium Economy Again?
Here's my honest take: LOT has some strong points (that food service is seriously impressive), and our outbound flight proved they can deliver a great experience when everything goes right. Maybe they were just having a really off day on this return flight. But the inconsistency is the real problem here. When you're paying premium prices, you expect a certain level of quality and service every single time, not just when you happen to get assigned to their newer aircraft. For now, I'll definitely think twice before booking Premium Economy with them again, at least until I hear they've updated their older aircrafts.
What This Experience Taught Me About Airline Travel
This whole experience really taught me that consistency matters so much when it comes to airline service. You can have the best food in the sky, but if the basic things like working seats and clean cabins aren't guaranteed, it's hard to justify the premium price tag. I always try to keep things real in my reviews, and while this wasn't the experience we were hoping for, I think it's important to share both the good and the bad. That's what helps all of us make better travel decisions, right? If you want to see more of my honest travel reviews and experiences, don't forget to check out my travel tips playlist.
This review reflects my personal experience flying LOT Polish Airlines Premium Economy. Your experience may vary depending on aircraft type, route, crew, and other factors. I was not compensated by LOT Polish Airlines for this review, and all opinions expressed are my own based on flights I paid for myself.
Links to everything I mentioned are available here: [link].
Oura Ring 4 Review: 6 Months Later - Brutally Honest Thoughts on This $500 Smart Ring
So I dropped over $500 on the Oura Ring 4 six months ago, and honestly? I have some thoughts. Like, a lot of thoughts. I've been testing different smart rings and wellness devices for over a year now, so I wanted to give this thing a proper long-term test before telling you whether it's actually worth the money. Spoiler alert: it's complicated.
The Three Lifestyle Changes This Ring Forced Me to Make
Here's the thing nobody tells you about smart rings. They don't just track your data, they basically call you out on your bad habits in a way you can't ignore. First major discovery: my beloved afternoon tea was absolutely destroying my sleep. I'm talking about a massive correlation between drinking anything with caffeine after 2 PM and terrible sleep scores. The data was so clear that I actually had to stop drinking tea after lunch, which honestly broke my heart a little because that was my favorite daily ritual. But I switched to caffeine-free options and my sleep improved so much.
Second wake-up call: eating heavy dinners late at night (like past 7 PM) was tanking my recovery. I could see it right there in the app, over and over again. Poor sleep, worse recovery scores, feeling like garbage the next day. So I started planning my last meal around 5-6 PM and cut out the late-night snacking on sweets and chocolate. Game changer.
Third thing: any day I actually hit my activity goals directly correlated with better sleep AND lower stress during the day. It's not just something I imagined, the data backed it up completely. These three changes alone made the ring worth it for me, but let's talk about everything else.
How the Ring Held Up After 6 Months of Non-Stop Wear
Let me be real with you. This ring definitely has some scratches now. I haven't been super careful with it, and you can see some light marks if you look up close. But honestly? For something I've worn 24/7 for six months straight, it's not as bad as I thought it would be. From a normal distance, you really can't tell. Actually, when I compare it to my Ultrahuman Ring AIR, that one has way more visible scratches. So the Oura is holding up better than I expected, which is good considering how much I paid for it.
Battery life has been solid too. Still getting around 5-6 days per charge, which is what it was when I first got it. I was worried it would degrade over time like my iPhone battery did, but nope. Still going strong. And here's what I love: it charges SO fast. Like, I can charge it fully in the time it takes me to shower. I don't even need to do it every day. Literally finish my shower and the ring is charged. Super convenient.
Temperature Tracking Is Surprisingly Accurate (Sleep Tracking Too)
Okay, so after testing multiple smart rings, I can tell you the Oura Ring 4 is way more consistent when it comes to temperature tracking. This matters a lot to me because I use it with the Natural Cycles app for tracking my cycle. Having reliable temperature data is actually really important for that, and the Oura delivers. The graphs are consistent, the readings make sense, and it's picked up on when I was getting sick multiple times before I even felt symptoms myself. That's pretty cool.
Sleep tracking is also incredibly detailed. Like, it will catch if I was awake for just a minute or two during the night. Sometimes I'm like "wait, was I actually awake then?" and then I remember getting up to check something or adjusting my pillow. It's that accurate. The sleep data has been the most valuable part of this whole experience, to be honest.
But the Stress Tracking? Hit or Miss
Here's where things get frustrating. Some days the stress tracking is spot-on and I'm like "yes, this is exactly right." Other days it tells me I'm super stressed when I'm actually feeling pretty chill. What I've noticed is that the ring confuses being mentally focused and productive with being stressed. Like today, it told me my body was more stressed than usual, but I wasn't anxious or stressed at all. I was just really plugged into work and getting stuff done. I wish it could tell the difference between actual stress/anxiety and just being in the zone mentally.
So if you're buying this ring mainly for stress data, just know it's not always accurate. At least not for me. Sleep and temperature? Great. Stress? Eh.
The Apple Health Integration Is Actually Really Useful
One thing I really appreciate is how seamlessly this syncs with Apple Health. Everything just automatically updates, so I can go back years and look at trends and comparisons. It gives me way more data than when I was just using my Apple Watch, mainly because I wear the ring constantly and I wasn't wearing my watch 24/7. Having all that health data in one place for long-term tracking is honestly pretty valuable.
What I Don't Like: Monthly Fees and Activity Tracking Issues
Okay, time for the complaints. First: the monthly subscription. After dropping over $500 on this ring, I have to pay an extra $6-7 per month just to use the full app? That feels wrong. I paid for a year upfront (around $60) but knowing I'll have to keep paying forever just to access my own data is annoying. I get that companies love subscription models, but this one is hard to swallow.
Second issue: automatic activity tracking has gotten worse over time. When I first got the ring, it would recognize when I was on a walk and send me notifications to add the activity. Now? It misses walks all the time, even when I have my phone with me. I don't know what changed, but it's definitely not as consistent as it used to be. If you're looking for serious fitness tracking, honestly just stick with an Apple Watch. The Oura is not there yet for that stuff.
Pro Tip: Using FSA or HSA to Buy It
Here's something useful: you can actually use your medical FSA or HSA account to buy the Oura Ring since it counts as a medical device. That's what I did. If you have one of those accounts through work, definitely look into this before buying. It makes the price a bit easier to handle.
So Would I Spend $500 on This Again? Honestly, Yes
Despite all my complaints about the subscription fee and the activity tracking issues, I would 100% buy this ring again. The sleep insights alone have been worth it. The temperature tracking for cycle monitoring has been incredibly reliable. And seeing my habits reflected back at me in actual data motivated me to make real changes that improved how I feel every day. That's valuable.
I'd recommend the Oura Ring 4 if you're the kind of person who's motivated by data and wants to optimize your sleep and daily habits. If that sounds like you, this ring will probably change some things for the better. But if you mainly want fitness tracking for runs and workouts, save your money and get an Apple Watch instead. The Oura just isn't designed for that.
For now, I'm sticking with this ring. It was a lot of money, but the experience has been worth it for me. The app gives me better insights than my other devices, and having it sync with Apple Health means I'm building a long-term health data record that could be really useful down the line. If you want to see the ring up close and hear more about my experience, I made a full video showing the wear and tear, the app interface, and everything else. Check it out above.
This review reflects my personal experience after six months of daily use. Your results might be different. If you have specific health concerns, talk to your doctor before relying on any tracking device for medical decisions.
Links to everything I mentioned are available here: [link].
Ecobee Premium Review: The Smart Thermostat That Saved Me $10,000 and Monitors Air Quality
When my electrician told me I needed a $10,000 furnace replacement because my Nest thermostat kept causing system failures, I was devastated. But switching to the Ecobee Premium not only solved my HVAC problems instantly, it also introduced me to air quality monitoring that's been a game-changer for my work-from-home productivity. Here's my complete review after using both generations of Ecobee thermostats.
Why I Ditched Nest for Ecobee (Best Decision Ever)
My Nest Learning Thermostat looked pretty on the wall, but it was causing me serious headaches. The system would randomly stall, the auto-schedule feature was completely useless, and I was staring down a massive repair bill. My electrician straight up told me to get an Ecobee because they work better with most furnaces and don't have the weird compatibility issues Nest is known for. The second I installed the Ecobee, all my furnace problems vanished. Seriously, it was like magic.
What Makes the Ecobee Premium Actually Worth It
The Ecobee Premium isn't just another smart thermostat. It comes with a SmartSensor that you can stick in any room, and the thermostat will prioritize that room's temperature. I put mine in the bedroom so I'm not freezing at night because the living room happens to be warm from afternoon sun. The 60-foot range means you can put these sensors basically anywhere.
But here's what blew my mind: the built-in air quality monitor. This thing tracks CO2 levels, chemical pollutants, and humidity all day long. I had no idea that the CO2 in my home office was making me feel like garbage. Harvard research shows high CO2 can tank your brain function by 60%. No wonder I was dragging through afternoon work sessions.
Energy Data That Actually Helps You Save Money
Nest gives you cute little summaries, but Ecobee gives you the real deal. I can download 18 months of detailed energy data and see exactly when my system runs, how much energy it uses, and spot patterns I never noticed. This isn't just tech nerd stuff either. I actually lowered my energy bills by adjusting my schedule based on this data. Nest just tells you "your system ran for 4 hours today" which is basically useless.
The Air Quality Thing Is Actually Life-Changing
I used to have a separate Awair Element monitor sitting on my desk tracking air quality. Having it built into the thermostat is so much cleaner, and it covers the important stuff: CO2, chemical fumes, and humidity. When CO2 hits 1000 ppm in my office, I can literally feel my brain getting foggy. The Ecobee pings my phone so I know to crack a window or take a break.
This isn't just feel-good wellness nonsense either. Studies from Oxford show people work 60% faster when CO2 levels are lower. Since I work from home, this directly impacts my income. Better air quality means better work, which means more money. Simple math.
Installation Was Surprisingly Easy
I'm not exactly Mr. Fix-It, but the Ecobee installation was pretty straightforward. They include a Power Extender Kit for older homes without the right wiring, which saved me from calling an electrician. The app walks you through everything step by step, and I had it running in under an hour. Way easier than I expected for a device this advanced.
Smart Features That Don't Suck
The Premium has Alexa and Siri built right in, so you can talk to your thermostat or play music through it. I don't use this much, but it's handy for quick temperature changes when my hands are full. It also plays nice with HomeKit, Google Assistant, and pretty much every other smart home system you can think of.
Ecobee vs Nest: Why Ecobee Wins
After living with both systems, Ecobee beats Nest in almost every way that matters. Better furnace compatibility, way more detailed energy data, remote sensors included in the box, air quality monitoring, and controls that actually make sense. The new Premium screen is huge and super responsive compared to Nest's sluggish interface.
Nest looks cooler and has that learning thing going for it, but honestly, I'd rather have a thermostat that works reliably and gives me useful information. The Premium's radar technology for motion sensing is also miles ahead of Nest's basic sensors.
Six Months Later: Still Love This Thing
I've been using the Ecobee Premium for six months now, and it's been rock solid. The air quality alerts have become part of my daily routine, my energy bills are noticeably lower, and I sleep better because the bedroom sensor keeps that room at the perfect temperature. Zero regrets on this purchase.
The only downside is that it doesn't track quite as many air quality factors as something like the Awair Element, but it hits the important ones that actually affect how you feel day to day.
Bottom Line: Should You Buy It?
At $329, the Ecobee Premium is absolutely worth it if you're upgrading from a basic thermostat or having issues with Nest. The SmartSensor alone costs $50 if you buy it separately, and you get air quality monitoring that could literally make you more productive at work. For anyone working from home or dealing with allergies, this is a no-brainer purchase.
Just make sure to check the compatibility tool on Ecobee's website before you order. Most systems work fine, but it's worth double-checking so you don't have any surprises during installation.
Watch My Full Video Review
I made a detailed video [link] showing the installation, all the features, and real-world testing with actual air quality readings. Check it out above if you want to see this thing in action before making a decision.
This review reflects my personal experience with the Ecobee Premium. Your results may vary based on your home's setup and usage. When in doubt, consult an HVAC professional for system-specific advice.
Links to everything I mentioned are available here: [link].
Smart Wings Motorized Drapes Review: Are They Worth $800? (Honest 1-Month Test)
After living with Smart Wings motorized drapes for over a month, I'm ready to share the brutal truth about whether these smart curtains are actually worth the investment. Spoiler alert: they're definitely not as "90% blackout" as advertised, but there are some surprising benefits I didn't expect.
Why I Chose Motorized Drapes Over Smart Blinds
When I moved into my current apartment six months ago, it came with installed blinds that were basically useless. They weren't blackout at all, and opening them was like arm wrestling with a stubborn toddler every morning. I initially wanted to get Smart Wings motorized blinds, but here's the thing: I can't uninstall the existing blinds in this rental.
That's when I discovered motorized drapes could be the perfect solution. Since I'm renting, I need something I can easily take with me when I move. Custom blinds are usually made for specific window dimensions, but drapes offer way more flexibility for future apartments. Plus, I can keep the existing blinds installed and just not use them anymore.
Smart Wings vs West Elm: The Real Cost Comparison
Before you think motorized drapes are crazy expensive, let me break down the numbers that shocked me. I was originally looking at West Elm curtains, and here's what that would have cost me:
For my window size, I needed four sets of West Elm blackout curtains at $159 each, totaling $636. And that's WITHOUT a rod, let alone a motorized one that works with Apple Home and Alexa. When you factor in a quality motorized rod system, those "cheaper" curtains would have easily hit $800-900.
The Smart Wings motorized drapes with the rod included? Less than what I would have paid at West Elm. That's honestly crazy when you think about it.
Installation: Easier Than Expected (But You Need Two People)
I'm not going to lie and say I installed these myself. My husband did most of the work, but it honestly didn't take much longer than installing a regular curtain rod (which I have done in my bedroom). If you live alone, just hire a handyman. It's worth it.
The best part? Once the rod is up, you literally just plug the motor into an outlet and you're done. No programming, no complicated setup. It comes with a simple remote, and it's compatible with Google Home, Apple Home, and Alexa (though I had compatibility issues with my old Apple TV that I'll get into later).
The Sound Dampening Effect I Didn't Expect
This was honestly the most surprising benefit. The moment we installed these drapes, I noticed how much less echoey the room became. We don't live on a super busy street, but it gets loud, and these drapes provide sound insulation that the old blinds never did.
The space feels cozier and quieter, which makes these drapes perfect for bedrooms too. It's like getting acoustic treatment and window covering in one.
Apple Home Integration: My Compatibility Mistake
Here's where I messed up. I assumed these would work with my Apple TV for smart home control. Turns out my Apple TV is too old to be compatible. So right now, I'm stuck using just the remote instead of voice commands or scheduling through the Apple Home app.
I'm waiting for the new Apple TV to come out in the next few weeks, but this taught me an important lesson: make sure your existing smart home devices are actually compatible before ordering the premium motor option.
Cable Length: Learn From My Mistake
I ordered the 2-meter power cable thinking it would be enough. Big mistake. My outlet isn't right next to the window, so the cable is visible and kind of annoying. If I had ordered the 3-meter cable instead, this wouldn't be an issue.
Always go with the longer cable option. You can work with extra length, but you can't magically make a too-short cable reach. Learn from my error and save yourself the headache.
Motor Performance: Insanely Quiet Operation
The motor on these drapes is extremely quiet. I mean, you can barely hear it running. This is huge if you have people sleeping in your home when you want to open or close the curtains. My old blinds were so loud they could probably wake the neighbors.
The remote is also responsive and can actually control up to five different drapes or blinds, so if you order multiple sets, you can control them all with one remote.
Fabric Quality vs. Blackout Reality Check
The fabric itself is insanely soft and came in perfect condition. No washing or steaming required, which was nice. It's not too stiff, making it easy to maintain.
But here's the biggest disappointment: these are supposed to be 90% blackout, and they're definitely not. I'd say maybe 40% blackout at best. If you're looking for something to make your bedroom pitch black, this isn't it. They're great for living rooms where you want privacy but still some natural light, but don't expect true blackout performance.
My Measurement Mistakes and What I Learned
I completely messed up my measurements because I didn't check where the wall studs were before measuring. I had to mount the rod in a different location than planned, which threw off all my dimensions.
Fortunately, since these are drapes and not custom blinds, they still look fine even with wrong measurements. This flexibility is actually a huge advantage. I went slightly longer rather than shorter, which means I can always shorten them later or use them as-is (even though they drag on the floor a bit).
Lesson learned: always check for studs first, then measure.
What I Ordered: Complete Breakdown
Here's exactly what I selected if you want to copy my order (but learn from my mistakes):
- Fabric: Cream (lightest option, perfect choice)
- Type: Motorized Drapery 90% Blackout (not actually 90% blackout)
- Mounting: Window Trim to Window Trim
- Dimensions: 120" width x 105" height
- Opening: Two-way open
- Motor: Most expensive option with Apple Home, Alexa, Google Home, and SmartThings compatibility
- Valance: Yes (adds $25 but worth it for the finished look)
- Remote: White
- Power Cable: 2-meter (should have gotten 3-meter)
The valance does help hide the rod for a more polished look, though it came a bit wrinkled and hasn't smoothed out as much as I hoped.
Final Verdict: Would I Order Again?
Honestly? Yes. These drapes were still cheaper than what I would have paid for West Elm curtains plus a separate motorized rod system. I love the convenience of having them on a schedule (once I get my Apple TV situation sorted out), and I'm saving time every day by not wrestling with those terrible blinds.
The sound dampening alone makes them worth it, and the motor being so quiet is a huge bonus. I just wish they had more truly blackout options and the valance looked a bit more polished.
For anyone considering smart window treatments, these are definitely worth the investment, especially if you're renting and want flexibility for future moves.
Smart Wings provided these drapes at no cost for review purposes. However, I received no monetary compensation and was under no obligation to provide a positive review. All opinions expressed are my own and based on my honest experience using these drapes for over a month in my home.
Links to everything I mentioned are available here: [link].
Is Plasma Pen a Scam? 3-Year Honest Review of At-Home Skin Tag Removal
If you've been wondering whether plasma pens actually work or if they're just another beauty scam, you're not alone. After using a plasma pen for three years to remove skin tags, cherry angiomas, and sebaceous hyperplasia, I'm sharing my completely honest experience - including the time I messed up badly and thought I'd have a permanent scar.
What Is a Plasma Pen and What Does It Claim to Do?
A plasma pen is an at-home device that claims to remove various skin growths including skin tags, cherry angiomas, sebaceous hyperplasia, and even wrinkles. These devices typically cost between $100-$300, making them significantly cheaper than dermatologist treatments that can cost hundreds of dollars per session. The device works by creating an electrical arc that burns away unwanted skin growths.
My 3-Year Experience: Does Plasma Pen Actually Work?
After three years of testing, I can confidently say that plasma pens do work - but with important caveats. Here's what I discovered:
What Worked:
• Successfully removed multiple skin tags on my body multiple times
• Cherry angiomas on my chest haven't returned after removal
• Most skin tag treatments required only one session
• Healing time was typically 1-2 weeks
What Didn't Work:
• I refuse to use it on my face due to safety concerns
• One time I overdid it and healing took 3 months
• Requires careful technique and practice to avoid scarring
• The smell of burning skin takes getting used to
The Time I Messed Up: A Cautionary Tale
Not everything went smoothly during my plasma pen journey. When removing a skin tag on my back, I made the mistake of not using a mirror and overdid the treatment. What should have healed in 1-2 weeks took three months, and I was convinced I'd have a permanent scar. Thankfully, with consistent use of anti-scar gel, my skin healed with no visible marks, but that might not be the case for everyone and the results may vary.
Plasma Pen vs Dermatologist: Cost and Safety Comparison
The cost difference is significant. While a plasma pen costs around $100-$300 upfront for unlimited use, dermatologist treatments can cost $200+ per individual session. However, professional treatment comes with medical expertise, proper sterilization, and safety protocols that you can't replicate at home. For facial treatments and areas near the eyes, I always recommend seeing a dermatologist.
Safety Concerns and Who Shouldn't Use Plasma Pens
Plasma pens aren't suitable for everyone. You should avoid using them if you:
• Have a history of keloid scarring or hyperpigmentation issues
• Feel intimidated by the burning smell and process
• Want to treat areas on your face or near your eyes
• Have diabetes or other conditions that affect healing
• Are unsure about whether a growth is benign
The risk of infection, scarring, and improper healing is real when not used correctly.
My Step-by-Step Process
If you're considering a plasma pen:
1. Consult a dermatologist first - Get a professional skin check and try one treatment professionally
2. Start small - Begin with newer, smaller skin tags that are easier to remove
3. Use proper lighting and mirrors - Always see exactly what you're working on
4. Practice on fruit first - Get comfortable with the device before using on skin
5. Follow aftercare religiously - Keep the area clean and use healing products
Do Skin Tags Come Back After Plasma Pen Treatment?
One of the most common questions I get is whether skin tags return after plasma pen removal. In my experience, the specific skin tags I removed have not grown back in the same locations. However, I have developed new cherry angiomas and skin tags in different areas, which is normal as we age. The key is catching new growths early when they're easier to treat.
The Bottom Line: Is Plasma Pen Worth It?
Are plasma pens a scam? Absolutely not - but they're not miracle devices either. They can effectively remove certain skin growths when used properly, but the learning curve and risks are real.
The plasma pen works, but it requires patience, proper technique, and realistic expectations. Watch my full review above to see my complete experience, including detailed before and after results and the mistakes you should avoid.
This content is for educational purposes only and is not medical advice. Always consult with a licensed dermatologist before attempting any at-home skin treatments. Plasma pens can cause scarring, burns, and other serious injuries if used improperly. Individual results may vary, and this review reflects personal experience only.
Links to everything I mentioned are available here: [link].
In this video, I'm comparing two toaster ovens that couldn't be more different - the compact Panasonic FlashXpress (around $150) versus the much larger Breville Smart Oven Air Fryer Pro ($350+). After using both for months, I discovered some surprising things about what you can and can't do with each one (spoiler: one of them completely failed at something I really needed it for). If you're trying to decide between a small, simple toaster oven or investing in a bigger, more versatile countertop appliance, this comparison will definitely help you figure out which one actually makes sense for your kitchen and cooking style. 🎥 my most recent vlog: → https://www.youtube.com/watch?v=pjQkpCX3ozY&list=UULFCWgCP5rY1cEVGGK2bHcY4w&index=1 🔗 links → Breville Smart Oven Air Fryer Pro BOV900BSS, Brushed https://ift.tt/PaexVFu https://ift.tt/SIZFtKU https://ift.tt/dlyQnmS → Breville Smart Oven Air Fryer https://ift.tt/eMr3UC0 https://ift.tt/tLgFDzG https://ift.tt/9cDYUQm https://amzn.to/4eVOgtq → Panasonic FlashXpress Toaster Oven https://amzn.to/46lnDMq https://ift.tt/xUqHQv5 → Cuisinart Air Fryer Toaster Oven with Grill https://ift.tt/rSvs6Ak https://ift.tt/kqUO1xF https://ift.tt/cVaguoN https://ift.tt/Wgnue0Z → Philips Premium Airfryer XXL https://amzn.to/44RDpMA 🏅my top videos: How to Get Rid of Skin Tags Moles Warts | PLASMA IQ vs PLASMA MOLE SKIN TAG REMOVAL PEN REVIEW DEMO https://youtu.be/RTXS3Gj2usc I Wore the Ultrahuman Ring AIR for 365 Days STRAIGHT 👀 Thoughts After 1 Year Review https://www.youtube.com/watch?v=pjQkpCX3ozY Is the Dyson Airstrait still WORTH IT?! - Honest Review https://youtu.be/XFRo8kArzf0 How to Get Rid of Cherry Angiomas Moles (Red Skin Dots) | PLASMA PEN REMOVAL REVIEW + DEMO + RESULTS https://www.youtube.com/watch?v=Bq3zrn7Q4O0 Dyson Airstrait vs Dyson Airwrap - What’s Better?! https://youtu.be/9dIze-VbVNc 👋 you can find me here http://juliacaban.com instagram: https://ift.tt/y8B6zHe tiktok: imjuliacaban subscribe: https://bit.ly/3aXtqaz 👩🏻💻 about me I'm Julia and I'm based in Los Angeles, CA 🌴 I make honest tech and gadgets reviews and useful tutorials. If you have any questions, feel free to leave them down below in the comments section - I make sure to reply to you all. I appreciate your support! ✉️ business inquires contactjuliacaban@gmail.com ⏳ timestamps 0:00 Intro 0:27 Product Introduction & Size Comparison 0:50 Price Breakdown ($150 vs $350) 1:16 Usage Experience & Timeline 1:44 Panasonic Performance - Toast vs Baking 2:07 Breville Versatility & Main Benefits 2:32 Cleaning Challenges with Breville 3:08 Breville Cooking Performance Details 4:14 Settings & Features Comparison 4:42 Space & Capacity Differences 5:18 Final Verdict & Recommendations 6:05 Settings Overview & Limitations 6:25 Versatility Summary & Energy Efficiency 6:52 Wrap Up 🔎 video topics toaster oven comparison, breville smart oven air fryer pro review, panasonic flashxpress review, countertop oven, air fryer toaster oven, best toaster oven 2025, breville vs panasonic, toaster oven buying guide, kitchen appliances, air fryer review, compact toaster oven, large capacity toaster oven, toaster oven for small kitchen, energy efficient cooking, convection oven, element iq technology, infrared heating ❗️disclaimer FTC: This video is NOT sponsored. All opinions expressed are my own. In order to support my channel, I share affiliate links, which means I earn a small commission if you make a purchase through them, however, this does not affect how much the item costs you. As an Amazon Associate, I earn from qualifying purchases. That being said, I only promote products that I genuinely stand by. 📽 gear Camera - https://amzn.to/3OZZlhj Lens - https://amzn.to/41Cfwqi 2nd Lens - https://amzn.to/3DlrZ5u 3rd Lens - https://amzn.to/3IP7QGa Lights - https://amzn.to/3BW0L3W Microphone Kit - https://ift.tt/d8BCYyw (mic) + https://ift.tt/Bd1lsrP (cable) + https://amzn.to/3P9qdeW (mount) Royalty-free Music - https://bit.ly/3LeY1W6 thanks for watching ❤️
Links to everything I mentioned are available here: [link].
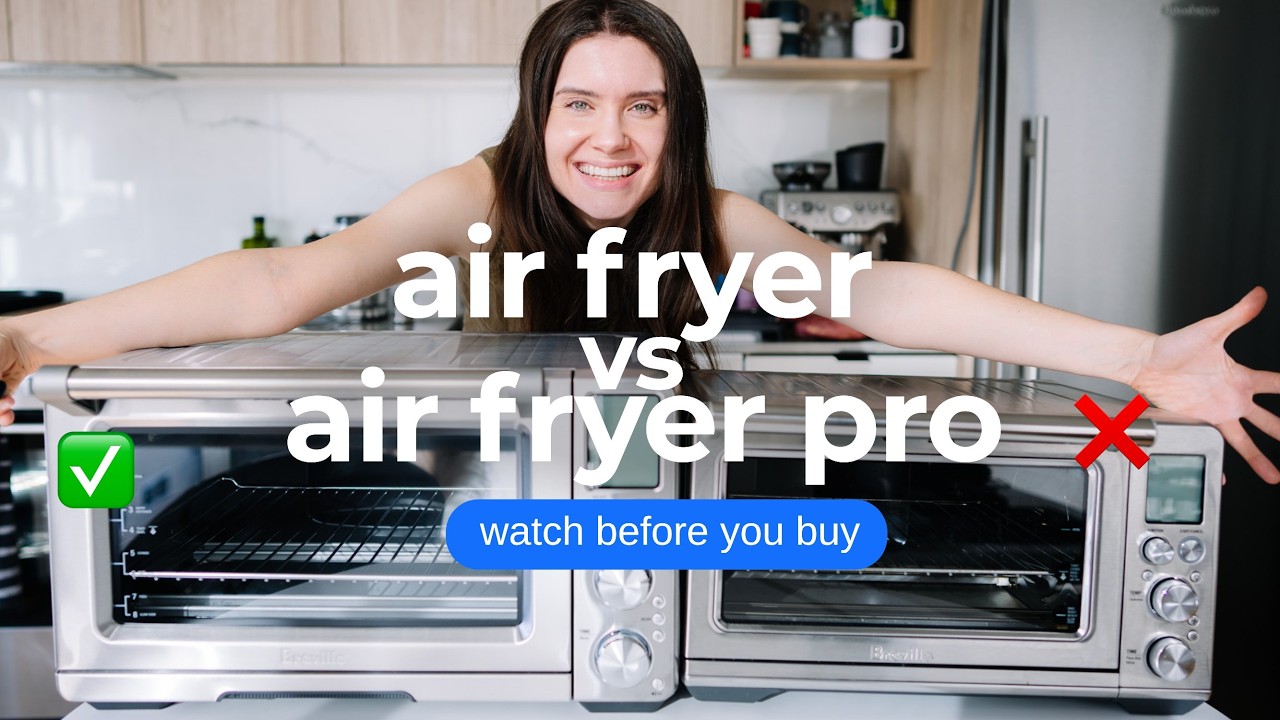
Breville Smart Oven Air Fryer Pro vs Standard: Honest Review and Comparison
After using both Breville air fryer models for years, I've discovered some major differences that most reviews completely miss. If you're deciding between the Breville Smart Oven Air Fryer and the Pro model, this comparison will save you from making the same mistakes I did.
The Real Differences Beyond Dehydrate and Proof Modes
Everyone talks about how the Pro model adds dehydrate and proof functions, but honestly? That's not the real story here. I've been using my standard Breville Smart Oven Air Fryer for over 4 years, and when I finally got my hands on the Pro model, the differences were way more significant than I expected.
The Pro model isn't just bigger (though it definitely is). The build quality, design details, and daily usability are completely different. We're talking about features that actually matter for everyday cooking, not just extra modes you might use once in a while.
Cleaning Nightmare: Why the Standard Model Drives Me Crazy
Let me be brutally honest about the biggest issue with the standard model: cleaning is a absolute nightmare. If you cook anything greasy (which, let's be real, is most good food), the whole interior gets covered in oil that turns brown and becomes impossible to remove.
I've tried everything - different cleaning pastes, S.O.S. sponges, you name it. The problem is that you can't use harsh chemicals because you'll damage the coating. I actually ruined my crumb tray trying to get it clean, and even after hours of scrubbing, it never looked right.
The Pro model completely fixes this problem. The door has way more glass coverage, which is actually the easiest part to clean. The heating elements are accessible for wiping down, unlike the standard model where they're basically unreachable. It's like they learned from all the complaints and completely redesigned the cleaning experience.
Size and Capacity: More Than Just Bigger
The Pro model can fit two air fryer baskets while the standard only fits one. If you're cooking for more than two people or have guests over regularly, this makes a huge difference. The interior is 1 cubic foot, which means you can actually fit a 14-pound turkey or most 9x13 pans.
But here's what's interesting - the external size difference isn't that dramatic. It's taller, wider, and slightly deeper, but it still fits in the same counter space as my old one.
Noise Levels and Static Issues
This is something I never see mentioned in other reviews, but the standard model has this annoying static noise whenever it's running. It's quiet, but it's there, and after a while it really gets on your nerves (especially if you're recording videos like I do).
I actually contacted Breville about it, and they replaced my unit twice. Same issue every time, so I think it's just inherent to that model. The Pro model? Dead silent. No static, no weird buzzing, just smooth operation.
Plus, the Pro model has a volume control button! You can actually adjust how loud the alerts are, which is amazing if you're cooking early in the morning or late at night.
Control Design and User Experience
The control knobs on the Pro model are completely different. With the standard model, I constantly overshoot the setting I want - the knobs just don't have good precision. The Pro model knobs feel more substantial and give you better control.
The LCD display is also clearer and more intuitive. Small details, but when you're using something every single day, these things add up.
Temperature Accuracy and Performance
Both models use Breville's Element iQ technology, but the Pro has 6 independent quartz heating elements versus 5 in the standard model. In practice, this means more even heating and better temperature control.
I've tested both with an oven thermometer, and when they say 350 degrees, they actually maintain 350 degrees. This is so much better than my regular oven, which is all over the place temperature-wise.
Is the Pro Model Worth the Extra Cost?
I paid full price for my Pro model (around $400 plus tax), and honestly? Worth every penny. The easier cleaning alone would have justified the upgrade for me. Add in the quieter operation, better build quality, and improved user experience, and it's a no-brainer.
If you're choosing between these two models, get the Pro. If you already have the standard model and cleaning drives you crazy like it did me, the upgrade might be worth considering.
I use these ovens literally every single day for everything from toast to full dinners, and the Pro model just makes the whole experience so much better. Sometimes those extra $50 really do make a difference.
Want to see the full comparison in action? Check out my detailed video review above where I show you all these differences side by side, including the cleaning issues and design improvements that make such a big difference in daily use.
The information in this post is based on my personal experience using both products over several years. Your results may vary depending on usage patterns and individual preferences.
Links to everything I mentioned are available here: [link].
AER Backpack Review: Travel Pack 3 vs City Pack 2 Ultra vs Tech Sling 3 - Which One Should You Buy in 2025?
Choosing the right AER backpack can be overwhelming with so many premium options available. After extensive testing of three popular AER bags - the Travel Pack 3, City Pack 2 Ultra, and Tech Sling 3 X-Pac - we've created this comprehensive comparison to help you make the best decision for your needs and budget.
The AER Travel Pack 3 stands out as the largest option in this comparison, designed specifically for travelers who need maximum storage capacity. This backpack easily accommodates both a 16-inch MacBook Pro and a 14-inch work laptop simultaneously, plus additional gear like a Steam Deck and clothing for extended trips.
Key features include three separate compartments for organized packing, a dedicated laptop section, and durable construction that withstands daily abuse. After over a year of consistent use across domestic and international flights, this backpack maintains its professional appearance and structural integrity. The main drawback is its heavier weight compared to other options, making it less ideal for minimalist packers.
The City Pack 2 Ultra revolutionizes everyday carry with its ultra-lightweight fabric that feels almost weightless while maintaining durability. This backpack targets professionals who prioritize portability without sacrificing functionality for work essentials.
Despite its compact appearance, the City Pack 2 Ultra still accommodates both 14-inch and 16-inch MacBooks in its dedicated laptop compartment. The wide-opening design provides easy access to contents, while multiple organizational pockets keep smaller items secure. However, space limitations mean you'll need to choose carefully what to pack - bulky items like thick hoodies may not fit comfortably.
The Tech Sling 3 X-Pac challenges expectations by fitting a 14-inch MacBook Pro in what appears to be a compact sling bag. The striking orange interior adds a modern aesthetic touch while providing excellent visibility for contents.
This versatile carry option works perfectly for coffee shop sessions, quick errands, or situations where a full backpack feels excessive. Multiple compartments include easy-access pockets for phones and accessories, plus deeper storage for tablets and other electronics. The adjustable single strap allows for comfortable wearing across the chest or over the shoulder.
Which AER Backpack Should You Choose?
Your ideal AER backpack depends on your specific use case and carrying preferences. Choose the Travel Pack 3 if you frequently travel with multiple devices and need maximum storage capacity. The extra weight becomes worthwhile when you can pack everything in one organized bag for flights and extended trips.
Select the City Pack 2 Ultra for daily commuting and office work where weight matters more than maximum capacity. Its professional appearance and lightweight design make it perfect for business environments and public transportation.
Consider the Tech Sling 3 X-Pac for minimal carry situations, coffee shop work, or as a secondary bag for specific occasions. Its unique form factor and surprising capacity make it ideal for users who prefer single-strap convenience over traditional backpack designs.
Final Verdict: Premium Quality Across All Options
All three AER bags deliver exceptional build quality, thoughtful design, and practical functionality that justify their premium pricing. The modular approach allows users to select different bags for different situations rather than compromising with a single option that tries to do everything.
For the complete video review showing detailed demonstrations of each backpack's features and real-world packing tests, watch our comprehensive comparison above. You'll see exactly how each bag performs and get a better sense of their size differences and organizational capabilities.
This review is based on personal experience and testing. This is not sponsored - all Aer bags were purchased with my own money. Individual needs may vary, and we recommend considering your specific use case when making a purchase decision. Some links in this article may be affiliate links, which means we may earn a small commission if you make a purchase through them, at no additional cost to you.
Links to everything I mentioned are available here: [link].
In this video I'm sharing my honest comparison after wearing both the Ultrahuman Ring AIR and Oura Ring 4 for over 30 days straight! One costs literally half the price with zero monthly fees, while the other has that premium reputation (but comes with ongoing costs). I tested everything - sleep tracking, activity monitoring, comfort, accuracy, and all those fancy health metrics they both promise. The results might actually surprise you, especially when it comes to which one I'd buy again if I had to choose. If you're torn between these two smart rings or wondering if the cheaper option is actually worth it, this comparison will help you decide without wasting your money! Subscribe: https://bit.ly/3aXtqaz 🎥 my most recent vlog: → https://www.youtube.com/watch?v=pjQkpCX3ozY&list=UULFCWgCP5rY1cEVGGK2bHcY4w&index=1 🔗 links → Smart Rings: Oura Ring 4: https://ift.tt/Ph2Cl3v / https://ift.tt/ryjToUW Ultrahuman Ring AIR: https://ift.tt/F7Je0IQ (Discount code: CAB10, Amazon Discount Code: AMZCAB10 - applicable only for US Amazon) Amazon Ultrahuman Link: https://amzn.to/4hYMdpP → Ring Accessories: Silicone Ring Cover for Oura/Ultrahuman Ring AIR (Size S): https://amzn.to/498j5bu Diamond Stackable Ring Eternity Bands for Oura/Ultrahuman Ring AIR: https://amzn.to/498j5bu 🎥 related videos - my smart ring videos: I Wore the Ultrahuman Ring AIR for 365 Days STRAIGHT 👀 Thoughts After 1 Year Review https://www.youtube.com/watch?v=pjQkpCX3ozY 6 MONTHS of UltraHuman AIR Fitness Tracking Ring - In Depth HONEST Review After Months of Daily Use https://www.youtube.com/watch?v=Mh5yFBbqmlA&list=PLH7GEfJeyDbbkbtlpd22zsq3MeS6O8I2S&index=3 UltraHuman AIR Fitness Tracking Ring - In Depth HONEST Review After 3 Months of Daily Use https://youtu.be/hmh8cX6-0Ps All my videos on: Smart Rings 💍🔥 https://www.youtube.com/playlist?list=PLH7GEfJeyDbbkbtlpd22zsq3MeS6O8I2S 👋 you can find me here http://juliacaban.com instagram: https://ift.tt/F1z3OwM tiktok: imjuliacaban subscribe: https://bit.ly/3aXtqaz 👩🏻💻 about me I'm Julia and I'm based in Los Angeles, CA 🌴 I make honest tech and gadgets reviews and useful tutorials. If you have any questions, feel free to leave them down below in the comments section - I make sure to reply to you all. I appreciate your support! ✉️ business inquires contactjuliacaban@gmail.com ⏳ timestamps 0:00 30 days wearing both rings 0:24 Price comparison and membership fees 1:10 Comfort and fit differences 1:56 Features both rings track 2:27 Oura Ring exclusive features 3:09 Activity tracking accuracy comparison 4:36 Stress tracking limitations to consider 4:53 Sleep tracking performance 5:18 Activity tracking detailed comparison 5:42 Final recommendation and conclusion 7:01 Long-term testing results 🔎 video topics oura, ultrahuman, oura ring 4 review, ultrahuman air review, smart ring comparison, sleep tracking, fitness tracker, wearable technology, oura vs ultrahuman, smart ring 2025, health monitoring, heart rate tracking, temperature tracking, cycle tracking, natural cycles, stress monitoring, apple watch alternative, fitness gadgets, sleep optimization, wellness tracker, ring sizing, battery life, subscription free ultrahuman ring air review, oura ring 4 comparison, smart ring comparison 2025, fitness tracker rings, sleep tracking ring, ultrahuman vs oura, best smart ring, smart ring no subscription, budget smart ring, oura ring alternatives, health tracking ring, fitness ring review, wearable technology, smart jewelry, sleep monitor ring, activity tracker ring, heart rate ring, temperature tracking ring, smart ring for women, cycle tracking ring, natural cycles app, smart ring accuracy, fitness tracker comparison, ultrahuman discount code ❗️disclaimer FTC: This video is NOT sponsored. All opinions expressed are my own. In order to support my channel, I share affiliate links, which means I earn a small commission if you make a purchase through them, however, this does not affect how much the item costs you. As an Amazon Associate, I earn from qualifying purchases. That being said, I only promote products that I genuinely stand by. 📽 gear Camera - https://amzn.to/3OZZlhj Lens - https://amzn.to/41Cfwqi 2nd Lens - https://amzn.to/3DlrZ5u 3rd Lens - https://amzn.to/3IP7QGa Lights - https://amzn.to/3BW0L3W Microphone Kit - https://ift.tt/Uh2Ps5o (mic) + https://ift.tt/1nRc20k (cable) + https://amzn.to/3P9qdeW (mount) Royalty-free Music - https://bit.ly/3LeY1W6 thanks for watching ❤️